I wanted a means of storing a broom, washing line prop and a mop out of the way and off the floor. I thought it would be a good idea if they could go on the back of the door to the cupboard that houses the central heating boiler. By doing that I would regain some 'lost' space.
A simple method would have been to fit a set of 'Terry' clips, spring clips that snap around round items such as fluorescent tubes. There are a couple of problems with that solution. The first is that the different items to be clipped up are of different diameters and I would need to obtain clips in different sizes. The second reason is that I don't like the idea of having something like a metal clip at eye height on the back of a door that can be moved, it is far too easy to walk into something like that.
Could something be made out of wood? I thought about various wedging ideas. Gardening shops sell a metal cam system that does the job that I want but they are expensive and are also possibly a hazard as mentioned above. Another system uses a sort of loop, hinged at the top. I've never seen that system in use so I'm not too sure how it works. Possibly the loop, door and handle form a triangle and everything hangs together? I tried to make something to test the idea but once the broom got anywhere near vertical it shot out of position.
Surely someone must have made something that works out of wood?
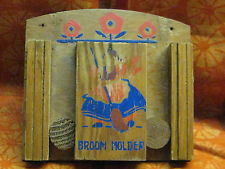
Eventually I came across an image of an antique 'Dutch' broom holder. Was it 'Dutch' because of the way it was decorated, where it was made or a generic term for the design? To date I haven't been able to find an answer.
The next question was 'how does it work?'
The picture showed a rectangular box with two vertical slots. Obviously the handles fitted in the slots. Part of a wooden wheel is visible in each slot. I concluded that hidden behind the front panel was a ramp for each wheel to ride up and a vertical strip for each broom handle to sit up against.
Using a hole saw I cut out some wooden wheels, effectively using what is normally the waste material. I found a bit of old floor boarding which was just a bit thicker than the board that I cut the wheels from. I used that to cut out the vertical and ramp pieces.
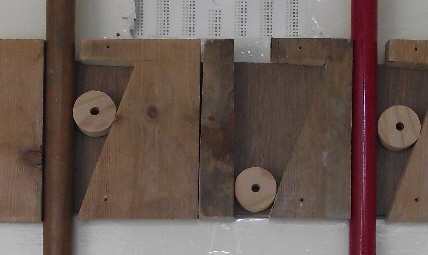
As can be seen from the centre example, the opening at the bottom has to be a bit wider than the widest handle and the diameter of the wooden wheel, or roller, has to be wider still to stop it falling out. The height and depth of the 'ramp' needs to be such that there is room for the wheel to be pushed out of the way by the widest handle.
Each wheel is completely free. As shown by the example of the centre holder, normally it will drop to the bottom of the slot. To use the holder the broom handle is pushed upwards, driving the wheel out of the way, until it clears the top of the slot. On letting go of the broom handle the wheel, which is in contact with the broom handle, naturally rotates anti-clockwise. That causes it to ride down the ramp. The combined action of gravity and friction drives the wheel as low down the slot as it can go, effectively wedging the handle in place.
To remove the handle it is simply necessary to push it up slightly, which forces the wheel to rotate clockwise and so remove the wedging action. The handle can then be pulled out forwards from the slot.
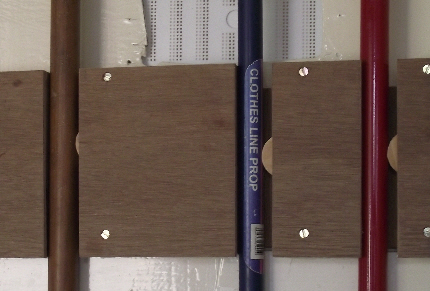
Adding plywood cover plates prevents the wheels from falling out, just leaving vertical slots visible.
Would I make another one differently?
This one was made to hold three handles so it made sense to make all the ramps with the same hand of slope. Where only two handles are to be held it would be better to stick to the 'original' layout. Using that layout both ramps could be made out of one piece, like a chevron. The 'waste' part could then be used to form the cap above the ramp by raising it by the diameter of the wheel.
Cutting a 'v' notch is simple in that it only takes two saw cuts, however it does produce a stress raiser at the apex which can make the finished part liable to break when handled during the assembly process. Once assembled that isn't really important. Rather than make the 'v' cut it might be an idea to use a hole saw to cut the 'apex' and then make two saw cuts into the resulting hole. The discard from the hole saw could then be sanded down to reduce the thickness and then used as the roller wheel.
Depending on what materials and tools are available it might be worthwhile using multiple layers of fibreboard or plywood, gluing them together to get the right thickness. Those with access to decent timber and a router might consider routing out the roller channels and handle slots from a solid piece of wood.
Page created 25 June 2014